
Modern landscaping demands a meticulous balance between aesthetic grandeur and biological efficiency. When we evaluate a residential or commercial site, we aren’t just looking at the surface beauty or the arrangement of retaining walls; we are assessing the viability of the earth beneath. Most soil in urban environments is either overly compacted clay or nutrient-depleted fill dirt, neither of which supports the deep root systems required for a high-end finish. To bridge this gap, modern landscape architects have turned toward advanced soil amendments that provide both structure and hydration. The most effective of these materials is coconut coir, a sustainable byproduct of the coconut industry that has revolutionized how we approach ground preparation. Integrating this medium into your planning allows for superior curb appeal that remains resilient even through the heat of mid-July or the unexpected freezes of late autumn.
Achieving a professional-grade landscape requires more than just planting a few shrubs. It involves a strategic understanding of how water moves through the property and how visual layers create a sense of depth. In regions with varying climates, the primary challenge is water management. Whether you are dealing with the arid conditions of the Southwest or the humid intensity of the Southeast, the soil must be capable of holding moisture while allowing excess water to drain away from the foundation of the home. This is where Coco Coir Soil Prep becomes the foundation of the entire project. By amending the local substrate with processed coconut fibers, we create a sponge-like environment that stores water at the root level while maintaining the oxygen-rich pores necessary for plant respiration. This dual-action capability transforms a standard garden into a self-sustaining ecosystem that requires less manual irrigation and fewer chemical interventions over time.
Landscape Design Principles
A professional landscape is built on the foundation of symmetry and intentional focal points. We begin by identifying the primary lines of sight, usually from the street or the main living room windows, to determine where to place specimen trees or architectural elements. Symmetry provides a sense of order and formality; however, we often employ asymmetrical balance to create a more natural, flowing environment. Utilizing different elevation layers is crucial here. By using retaining walls or raised beds, we can lift the garden, creating a sense of surround-sound greenery that envelops the viewer.
Irrigation planning must happen concurrently with these design decisions. We do not simply run hoses; we map out the hydrozones of the property. For example, a walkway lined with Boxwoods will have different water requirements than a perennial border filled with Coneflowers. Every design must account for the way light hits the space throughout the day. A focal point that looks stunning in the morning sun might be lost in the shadows by late afternoon, so we use reflective foliage or strategic lighting to maintain visual impact. Finally, walkways should be designed with both utility and grace in mind, leading the eye and the feet toward a destination, whether that is a secluded bench or a dramatic water feature.
Plant and Material Selection
| Plant Type | Sun Exposure | Soil Needs | Water Demand | Growth Speed | Maintenance Level |
| :— | :— | :— | :— | :— | :— |
| Japanese Maple | Partial Shade | Rich, Acidic | Moderate | Slow | Medium |
| Lavender | Full Sun | Sandy, Gritty | Low | Medium | Low |
| Hostas | Full Shade | High Organic | High | Medium | Low |
| Fountain Grass | Full Sun | Diverse | Low | Fast | Low |
| Hydrangea | Part Sun | Moist, Coir-rich | High | Medium | High |
| Boxwood | Full/Part Sun | Well-drained | Moderate | Slow | Medium |
Implementation Strategy
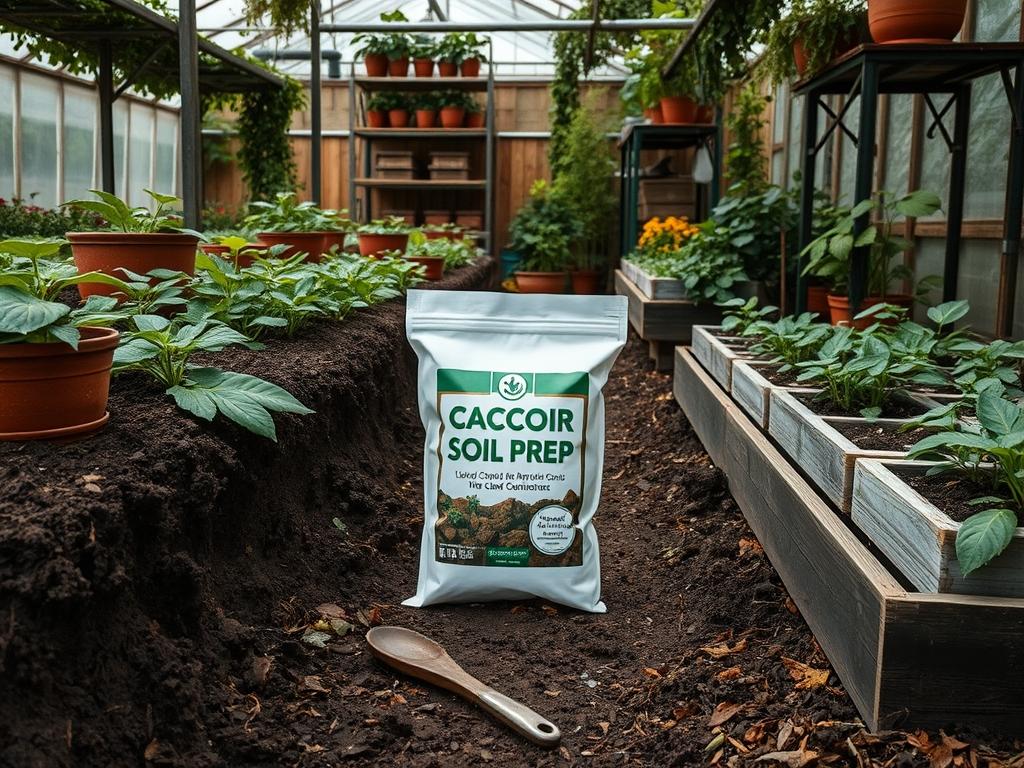
The transition from a blueprint to a blooming garden begins with the physical preparation of the site. Grading is the first and most critical step. We must ensure that the land slopes away from any permanent structures at a rate of at least two percent. This prevents basement flooding and protects the structural integrity of your hardscaping. Once the grade is established, we move into the intensive phase of Coco Coir Soil Prep. Unlike standard peat moss, which can become hydrophobic when dry, coco coir easily absorbs water even after long periods of drought. Professional landscapers typically purchase coir in dehydrated Coco Coir Bricks or blocks for easier transport.
To prepare the medium, place a 10-pound block of coir in a large industrial garden cart and add approximately 5 to 7 gallons of water. As the block expands, which can take 20 to 30 minutes, use a garden fork to break up the larger chunks. For larger landscape projects, we recommend a mix of 70 percent native soil and 30 percent hydrated coco coir. This ratio provides enough structure for stability while ensuring the root zone stays aerated. After the soil is amended, we lay out the edging to define the borders. Edging acts as a root barrier and keeps the mulch from migrating onto your stone walkways. A consistent 3-inch layer of organic wood mulch should be applied after planting to lock in the moisture that the coco coir is holding below the surface.
Common Landscaping Failures
The most frequent mistake we see in residential projects is improper drainage. Many homeowners believe that more water is always better, but without the correct soil structure, water sits in the root zone, causing rot and fungal infections. If the site has heavy clay, failing to amend it with coir or perlite creates an “underground bucket” effect where moisture cannot escape. Another common failure is root overcrowding. It is tempting to plant shrubs close together for an immediate look of fullness, but within three years, these plants will compete for the same nutrients and water, leading to the death of the weaker specimens.
Soil compaction is a silent killer in many landscapes. During construction or heavy renovations, machinery often packs the earth so tightly that roots cannot penetrate. This is why mechanical tilling and the integration of Coco Coir Soil Prep are mandatory for a successful installation. Furthermore, many people ignore the “buffering” needs of their soil. Coco coir is naturally pH neutral, which is beneficial, but it can occasionally lock up calcium and magnesium. Professional consultants always recommend adding a small amount of dolomitic lime or a calcium-magnesium supplement during the initial hydration process to ensure the plants have immediate access to these essential minerals.
Seasonal Maintenance
Spring is the season of renewal and heavy labor. This is the time to refresh the mulch layers and check the automated irrigation systems for any leaks or clogged nozzles. We also recommend a light tilling of the top inch of soil around perennials to re-introduce air and ensure that the previous year’s coir hasn’t been overly compacted by winter snow. As we transition into summer, the focus shifts to moisture management. This is where your Coco Coir Soil Prep pays dividends. While neighbors’ lawns might be browning, your amended soil will continue to provide a steady supply of deep-well moisture, allowing you to reduce your watering frequency by up to 50 percent.
In the autumn, the goal is preparation for the dormant months. We prune back spent perennials and apply a thicker layer of protective mulch to insulate the roots. This is also the best time to test the soil pH and add any necessary organic matter to replenish what was consumed during the peak growing season. When winter arrives, the work becomes observational. We monitor for “heaving,” where the freeze-thaw cycle pushes plants out of the ground. Because coco coir maintains a stable volume compared to clay-heavy soils, it helps mitigate this effect, protecting the delicate root crowns from exposure to the freezing air.
Professional Landscaping FAQ
How long does coco coir last in the soil?
Coir is high in lignin, meaning it decomposes much slower than peat or compost. In a standard outdoor landscape, you can expect the structural benefits of coco coir to last for 3 to 5 years before requiring re-amendment.
Do I need to wash my coco coir before use?
Most professional-grade Coco Coir Bricks come pre-washed. However, if you are sourcing in bulk from unknown suppliers, it is wise to rinse the hydrated coir to flush out any residual sea salts that might harm sensitive plant roots.
Can I use coco coir as a standalone mulch?
While it is excellent for soil mixing, using fine coco peat as a top mulch can be difficult because it is lightweight and may blow away in high winds. It is better to use it as a 1-inch base layer under heavier wood chips.
Is coco coir better than peat moss for the environment?
Yes. Peat moss is harvested from ancient bogs that act as carbon sinks, taking centuries to reform. Coco coir is a byproduct of the coconut harvest, making it a renewable resource that is discarded if not used in agriculture.
Why are my plants turning yellow in coir-rich soil?
If you see yellowing early on, it may be a nitrogen or calcium deficiency. Coir is great at holding water but has low nutrient density. Always use a balanced landscape fertilizer to supplement the plant’s nutritional needs during the first season.